Smol Pairing & Calibration
This page contains instructions to pair trackers and receivers, calibrate sensors, and use console commands for setup and troubleshooting.
Overview
This guide covers how to pair, calibrate, and update your Smol Slime trackers and receiver. You’ll use a serial terminal (such as nRF Connect or PuTTY) to run setup and troubleshooting commands.
Table of Contents
- Required Tools
- Pairing Trackers (First Time)
- Adding More Trackers
- Calibrate Trackers
- Troubleshooting
- Reference
Required Tools
You’ll need a serial terminal program to send commands to your trackers and receiver.
- Recommended: Download and install nRF Connect for Desktop.
- Install the Serial Terminal module inside it.
- Linux/Mac:
-
(Find your port withsudo screen /dev/ttyACMX 115200sudo dmesg.)
-
- Windows Alternative: PuTTY
Prefer an easy-to-use app? Check out SmolSlimeConfigurator
Pairing Trackers (First Time)
When first flashed, trackers and receivers boot into pairing mode automatically.
- If the devices are not in pairing mode:
- Receiver: Run
pair - Tracker: Hold the SW0 (Function) button for 5 seconds (or short RST/GND 3 times)
- The LED blinks once per second while in pairing mode.
- Receiver: Run
- Watch for
esb_eventoutput in the receiver console:<inf> esb_event: Added device on id 0 with address 95CB23A0FDF7
- Plug the tracker into your computer via USB.
- The tracker’s LED flashes four times once pairing is successful.
- Repeat for all trackers.
- Exit pairing mode by entering
exiton your receiver.
Adding More Trackers
You can pair individual trackers to your receiver one at a time using the add command (on the receiver) and then the set command (on the tracker).
- On the tracker, run:
info - Copy its "Device Address" (e.g.
95CB23A0FDF7). - On your receiver:
add 95CB23A0FDF7(replace the device address with yours). - Copy the pairing ID from the receiver output:
[00:46:06.485,778] <inf> esb_event: Pair the device with D94BDEF1E442005B
- On your tracker:
set D94BDEF1E442005B - Confirm pairing on the tracker — you should see:
[00:30:51.060,028] <inf> esb_event: Paired
- Repeat all steps for each additional tracker.
The tracker LED will stop blinking once paired. Verify it is connected by moving it to appear in SlimeVR Server. If they don't, reboot both trackers/receiver, then exit pairing mode on the receiver.
Calibrate Trackers
Basic Calibration
The basic calibration runs an accelerometer and gyroscope zero rate offset. This is usually all you need. There are two methods. When calibrating, place the tracker flat on a surface and keep it still until the LED indicates completion.
- Method 1: Press the SW0 (Function) button twice, then wait until the LED blinks four times to confirm calibration.
- Method 2: Connect your tracker to your computer and run
calibrate.
6-Sided Calibration
The 6-sided calibration aligns the accelerometer across all six axes. This method requires you to hold the tracker perfectly still on all 6 sides.
- Connect your tracker to your machine while it is powered on.
- Run the
6-sidecommand. - Place the tracker on each side as prompted. The console will tell you when to rotate, or you can watch for the LED success blinks.
You can unplug the cable immediately after executing the 6-side command. When prompted for the final side, it can be easier to disconnect your USB cable and position the side with the USB port on a flat surface.
Incorrect 6-side calibration can make tracking worse! Hold your tracker steady on a flat, stable surface during calibration.
Magnetometer
Magnetometer calibration is disabled by default. When enabled, it runs automatically — no button or command required. Slowly rotate your tracker 360° on each of its six sides while it’s flat on a surface.
The LED will blink when you place it flat on each side and will blink continuously when it is ready to save.
Magnetometers can improve tracking; however, in environments with strong magnetic interference (like metal desks or PCs), performance may worsen.
Troubleshooting
Linux: SlimeVR Server Cannot Detect Receiver
For Linux systems, a udev rule may need to be created for the SlimeVR Server to detect your receiver as an HID device.
Create the rules file:
touch /etc/udev/rules.d/99-hid-dongle.rules
Add the following rules to the file:
sudo tee /etc/udev/rules.d/99-hid-dongle.rules > /dev/null <<'EOF'
SUBSYSTEM=="usb", ATTR{idVendor}=="1209", ATTR{idProduct}=="7690", MODE="0666"
KERNEL=="hidraw*", SUBSYSTEM=="hidraw", ATTRS{idVendor}=="1209", ATTRS{idProduct}=="7690", MODE="0666"
EOF
Ensure it worked:
cat /etc/udev/rules.d/99-hid-dongle.rules
Note: You may need to update the idVendor and idProduct values for your receiver. Use lsusb to find the correct IDs.
Trackers Paired but Not Appearing in SlimeVR Server
- On your receiver:
exit. - Reboot the tracker:
rebootor press the SW0 button. - Reboot the receiver:
reboot. - Ensure the IMU is detected on the tracker:
info.- Functioning:
IMU: ICM-45686 - Non-Functioning/Not Detected:
IMU: None
- Functioning:
Tracker Repeatedly Outputs Serial Warnings <wrn> sensor: No packets in buffer and <wrn> sensor: Sensor interrupt timeout
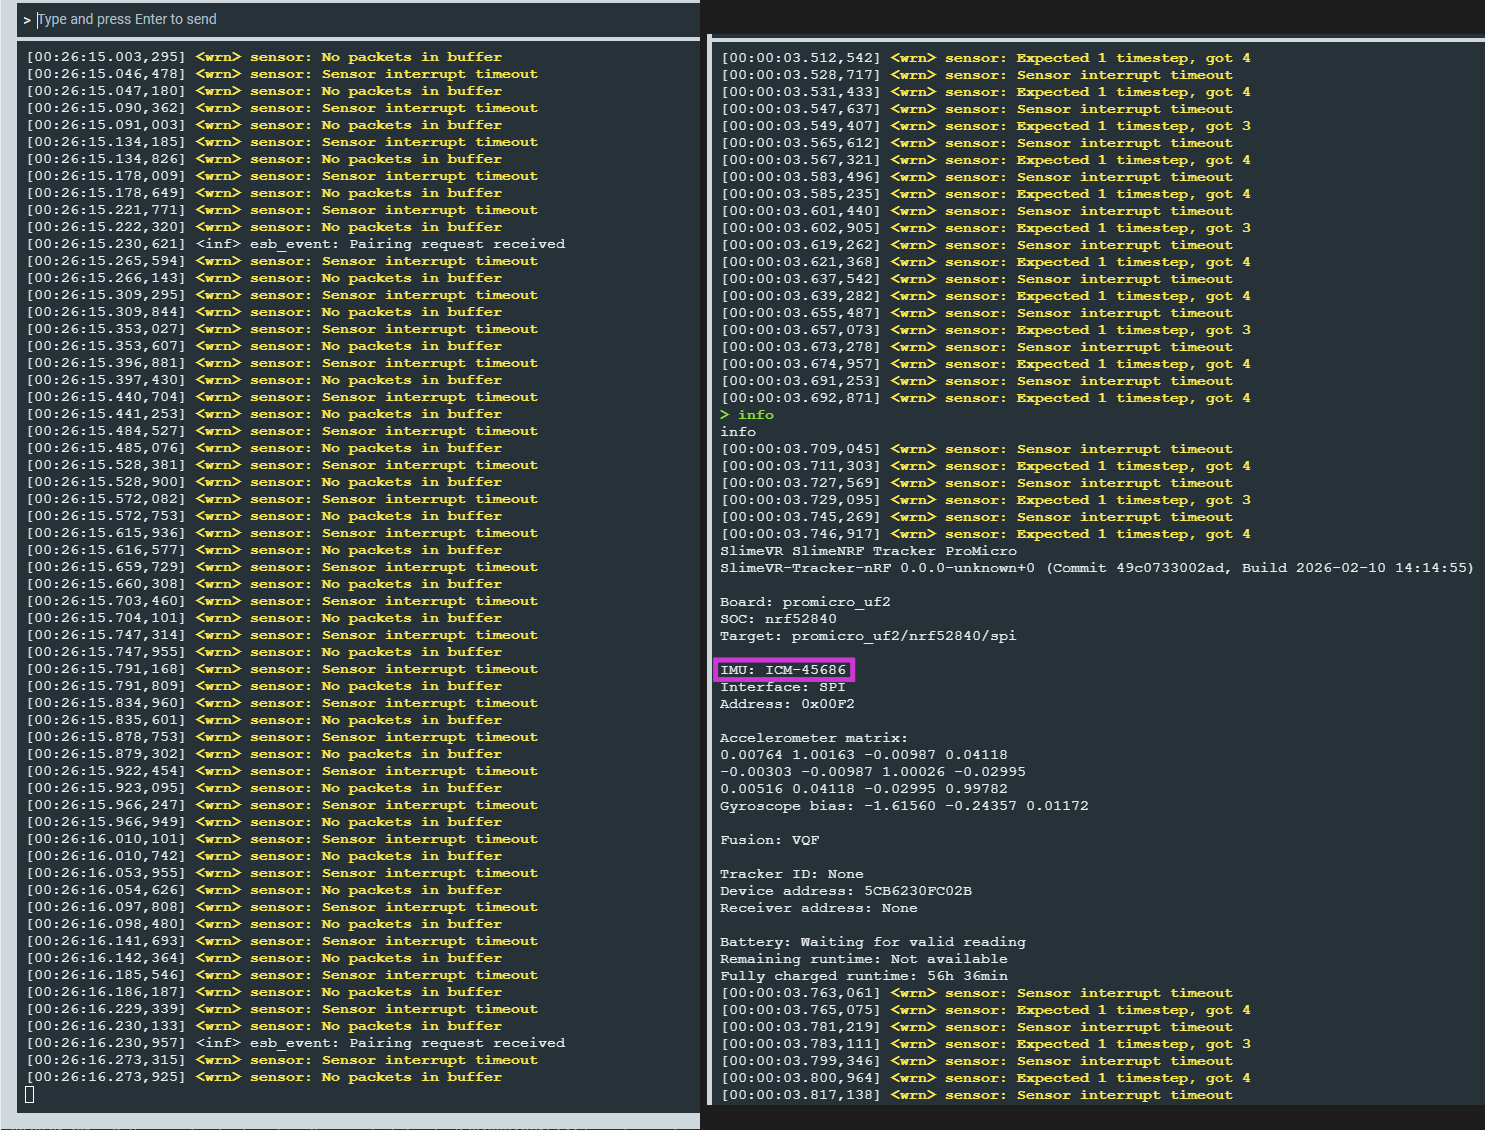
If the tracker repeatedly outputs these warnings:
<wrn> sensor: No packets in buffer
<wrn> sensor: Sensor interrupt timeout
Initial Checks:
- Reboot the tracker using the dedicated reboot button (if available), or by briefly shorting the RST and GND pins.
Diagnostic Steps:
- Run the
infocommand to verify IMU detection.
If IMU detected, solution:
- Check that the
INT1pin is properly soldered. See schematic: Smol Tracker
Reference
Status Codes
Status codes consist of one or more status values (added together) listed below:
| Code | Meaning |
|---|---|
| 1 | SYS_STATUS_SENSOR_ERROR |
| 2 | SYS_STATUS_CONNECTION_ERROR |
| 4 | SYS_STATUS_SYSTEM_ERROR |
| 8 | SYS_STATUS_USB_CONNECTED |
| 16 | SYS_STATUS_PLUGGED |
| 32 | SYS_STATUS_CALIBRATION_RUNNING |
| 64 | SYS_STATUS_BUTTON_PRESSED |
Created by Shine Bright ✨, Depact and Seneral. Edited by Brisfknibis.